
After exiting their airplanes at 15,000 ft, solo skydivers experience a gravity-fueled, adrenaline-pumped, belly-downwards freefall for about one minute until they open their parachutes. After stabilizing, they ride under the unfurled canopy for about 5 minutes before preparing for the most dangerous part of the act – landing!
There are three ways to land when skydiving. A sitting or slide-in landing, a standing landing, or parachute landing fall (PLF). The landing choice depends on several factors such as body position, flare height, flare timing, wind speed, and direction.
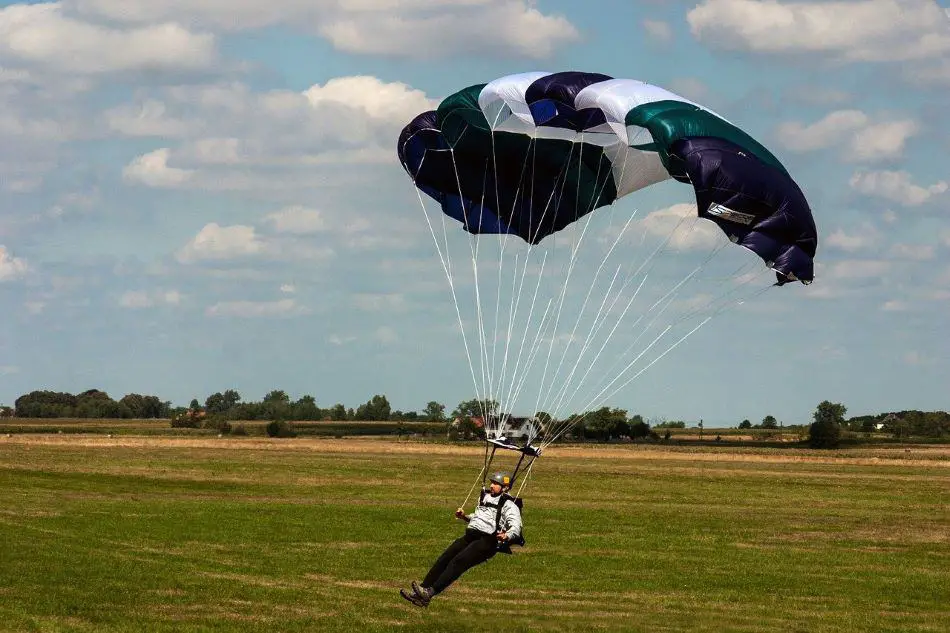
During solo landings, unlike tandem skydiving – where the skydivers are harnessed to their tandem instructors – solo skydivers have full control over their parachutes. A solo skydiver has to decide on the perfect timing when initiating his landing procedure – apart from choosing how and where he will make his safe landing.
The Three Landing Maneuvers for Solo Skydivers
Solo skydiving requires extensive training, adequate skill, and plenty of experience before being able to conduct a safe landing on the ground. Through the use of radio instructions during AFF Training, student skydivers are taught by their instructors the three different ways of approaching the ground.
As student skydivers develop greater experience with solo landings, they gradually get to decide on their preferred landing approach.
Sitting or Slide-in Landing for Solo Skydivers
The Sitting or Slide-In landing is considered the easiest and safest landing procedure for both tandem as well as solo skydiving. If a solo skydiver is not confident about his landing and is afraid of being injured when approaching the ground, it is recommended to perform the sitting or slide-in landing.
This approach requires solo skydivers to lift their legs in front of them with their toes pointing upwards towards the sky. As they flare and slowly approach the landing area (at around 1-6 mph) their buttocks will slide-in on the ground and absorb the impact. As a result, this approach is considered the safest landing procedure – specifically if skydivers expect to have a hard landing.
The chances of spraining an ankle or knee or breaking any bones are greatly reduced in a Sitting or Slide-In Landing.
As chances of landing on a muddy or grassy area in the drop zone are fairly high, skydivers should expect a fair bit of dirt on their clothing and shoes. It is highly recommended to keep this in mind when choosing an outfit for a skydiving trip! This is also the reason why many skydivers prefer the other landing approaches.
Are you curious about how likely you will get injured during a skydive? Check out my article about the true risks of skydiving. It will give you a mind-blowing, new perspective of the sport!
Performing a Standing Landing When Skydiving
The ultimate pride and joy of solo skydivers are to be able to perfect the “Standing Landing”. Here, skydivers attempt to come to a complete full stop, landing upright on the balls of their feet in a single go. If that is not possible because of too much speed, then skydivers try to compensate for the speed by running or walking.
Due to its complexity, even experienced skydivers sometimes experience challenges landing in a standing position. These challenges can vary due to the flare height, timing, as well as wind direction, and speed.
Skydiving schools and centers offer various canopy courses that teach the necessary techniques required to master the art of the Standing Landing. These courses help the skydiver to achieve greater confidence, satisfaction, and safety when attempting the Standing Landing.
Once adequate experience has been gained and you have become fairly accurate on the practice landings you can join competitive landings either individually or as part of a group.
An accurate landing is one of the great disciplines of skydiving, wherein skydivers attempt to land as close as possible to a set target known as “dead center”. The goal here is to get the best score each round and hit the target exactly at the dead center using the heel of your shoes. The individual or group with the highest combined scores after successive landings is declared the winner.
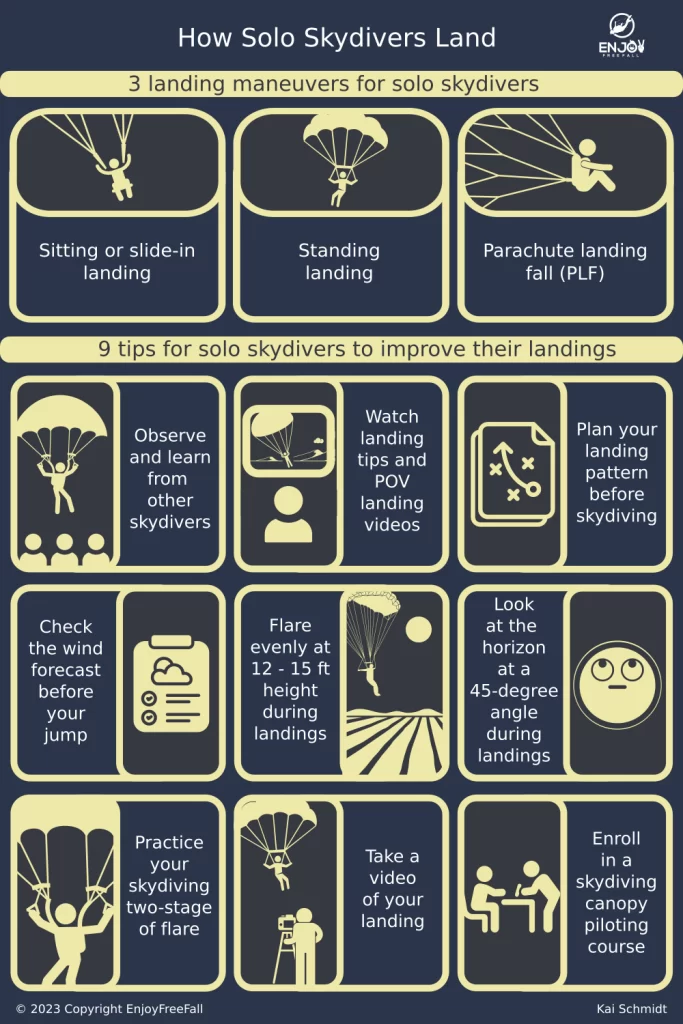
Performing a Parachute Landing Fall (PLF) When Skydiving
Whether you are still a beginner or an expert in skydiving, it is important to practice the Parachute Landing Fall (PLF) every now and then. PLF is a great technique for skydivers to master in order to land safely and to reduce the risk of injury.
The PLF technique aims to distribute the skydiver’s energy across their body when they fall at a high speed. It thereby increases the chances of survival (i.e. reduces the risks of injuries) when someone experiences a high-impact landing.
The technique originated in World War II and is nowadays used not just by skydivers but also by the military. It is also recommended to be used during emergencies such as when a person needs to jump from a high altitude (e.g. jumping out of a window to escape a dangerous fire).
Speaking of, are you interested in knowing how elite forces use skydiving in their operations and if it is similar to what it looks like in Hollywood movies? If yes, in my article “do special forces use wingsuit”, I demystify the common myths about military skydiving operations. The answer will surprise you!
Even experienced skydivers occasionally experience hard landings due to adverse weather conditions or strong winds and one can never know when PFL becomes necessary. Here are the steps to be followed when performing the Parachute Landing Fall during a hard landing:
- Make sure that your feet and knees are together and then flare until you approach the ground.
- Buckle your knees and focus on trying to land on the balls of your feet (upright position).
- Bend both arms in front of you to protect your face and throat while keeping your chin and elbows tucked in.
- Slowly roll over onto your side starting with your calf, thigh, hip or buttocks, and back (horizontal position) before trying to end on an “L” shape.
The fall can be performed in six directions (right side, right front, right rear, left side, left front or left rear) depending on your traveling direction, the wind, and the terrain. A common mistake and a big no-no are extending your wrists and arms to the ground to absorb the impact.
Other options to ensure a safe landing would be to either link your hands at the back of your neck while keeping your elbows tucked in or to keep your hands placed in front of your belly. This will prevent you from accidentally breaking your wrist or arms.
Speaking of safety, have you ever wondered about the reasons behind wearing a helmet during a skydiving? If you’re interested in learning more, read my dedicated article, where you’ll discover valuable insights into the significance of skydiving helmets, along with an overview of the corresponding regulations in Europe, Australia, and the USA!
Nine Tips for Solo Skydivers to Improve Their Landings
Once a solo skydiver obtains their “A” license, they can then decide on how, when, and where they prefer to land. It also becomes their sole decision on whether to improve their landing skills or not.
If you are reading this article without having done a skydiving certificate, make sure to read my guide about how to get a skydiving license. The guide covers everything that you need to know including different courses, requirements, types of training, duration and costs. It also reveals some practical tips to make the most of your skydiving certification course!
If you want to improve your landings here are the different tips and techniques that are used by experienced skydivers and world-class canopy trainers.
Observe and Learn From Other Skydivers
As a novice skydiver, by simply going 45 minutes or an hour earlier to your skydiving appointment you can watch the more experienced skydivers land successfully and internalize their body position, flare timing, and the timing of setting their feet onto the ground.
Observing is a great way to learn new techniques because you see how a maneuver is executed correctly and thereby can internalize the movement. Keep in mind, however, that each skydiver usually has their own specific style.
The best part of observing is that you get all these priceless practical tips for free. By observing other skydivers, you can visualize your own landing technique and check whether you are doing it right or not. It is advisable to test out different styles during your landing procedures to check what works for you best.
However, before doing any advanced maneuver, it is best to consult and discuss your intentions with your skydiving instructor to make sure that your canopy is designed for the particular landing routine.
Watch Skydiving Landing Tips and Point of View Landing Videos
Another option (right in the comfort of your own home) is to watch YouTube videos of different landing tips. Specifically, Point-Of-View videos where experienced skydivers film their landing with a head-mounted camera have proven as a great way to improve someone’s landing.
Point-Of-View videos allow you to observe the landing in the “real” perspective e.g. how it looks when approaching the ground. Most of the time, you will also see the hands of the skydivers as they flare. You can pause and rewind the video if you did not get anything properly. You can also take note of these tips and apply them during your own landings.
Once again, make sure to counter check with your instructor what you learn online. Ask them if it is correct and if it’s an acceptable practice at your drop zone because some drop zones have their own landing preferences.
Plan Your Landing Pattern Before Skydiving
Planning your landing pattern is as important as planning your freefall. On the ground, even before boarding the airplane, it is recommended that skydivers plan their landing. Always check with the drop zone if they have a specific landing pattern; some prefer to do it either at the right or left side of the drop zone depending on the traffic density.
This is also the perfect time to try some of the landing tips that you’ve learned from observing other skydivers and to check which one best suits you.
As you progress and gain experience, it will be easier for you to land standing (and perhaps even develop your own technique)!
Check the Wind Forecast Before Your Jump and While Landing
The wind speed and direction can greatly assist the skydiver in landing safely. Wind spotting is a useful skill that can help skydivers to achieve this goal. It can be done at different altitudes such as exit altitude, deployment altitude, and when approaching the ground.
Wind spotting can be done by checking the wind forecast from the National Weather Service and additionally by checking the flags and windsocks at the dropzone. By doing so, skydivers can plan their landing pattern better and use techniques that are appropriate for the specific wind condition.
In general, skydivers should always try to land into the wind because it will slow them down. However, if there are any obstacles on the ground it is always better to land crosswind than to hit those obstacles.
Skydivers can also use the wind to assist them as they approach the ground. If there is no surface wind, the canopies will drastically lose forward motion. Thus having the appropriate wind speed will allow skydivers to achieve a full and smooth stop.
Flare Evenly at 12-15 Feet Height During Skydiving Landings
One of the challenges of landing is knowing the perfect time to flare (i.e. breaking). Some skydivers either flare too early or too late and some flare unsymmetrically. Flaring properly means that you mean it, and do not do it half-heartened. Make sure that both your hands are symmetrical as you pull your brakes for a full stop.
Flaring needs to begin at around 12-15 ft from the ground. If you flare too soon and too far from the ground you might cause a hard landing because your speed will accelerate until you reached the ground.
Flaring properly helps skydivers to decrease their downward and forward motion from around 17 mph to between 1-6 mph. It also allows for better control of your canopy as you approach the ground.
Look at the Horizon at a 45-Degree Angle During Skydiving Landings
After flaring perfectly at the right height, the next tip is to look at the horizon at a 45-degree angle. Looking down at the ground will give you a false perspective on your height. To touch the ground, you might end up stretching your feet too early which might result in injury.
To get an idea of how a 45-degree angle should look like – climb a flight of stairs and stop anywhere between 12 to 15 steps before looking down – that will give you a good perspective of around 12 to 15 ft in height.
As a beginner, it is important to determine if you have reached the correct flare height by taking reference at your line of sight to a nearby building, a faraway tree, or even a windsock. Once you have familiarized yourself with the nearby structures around the landing area then it will be easier for you to orient yourself and estimate your distance from the ground.
Practice Your Skydiving Two-Stage of Flare
To achieve the two-stage flare, you would first need to fly on a level wing, making sure that both hands are straight up. After initiating the first flare evenly you must continue to fly and glide the canopy as much as you can without touching the ground.
Just before touching the ground, you can begin performing the second flare and position yourself to either stand, walk, or run. You can do this by leaning forward as you start your landing process.
It is also important to check if your canopy is designed for a two-stage flare. You can perform canopy drills above 2,000 ft to practice your two-stage flare. Just make sure that the surroundings are clear and that no one is around you before doing the same.
Some instructors even teach three-stage flare so it is advisable to ask them which flare technique is suitable for your level of skills and experience.
Take a Video of Your Skydiving Landing
Difficulty in landing is experienced not just by beginners but also by experienced skydivers. During your training as you are still under the supervision of an instructor, ask them to film your landings so that you can have a post-landing evaluation and review. This feedback will greatly help you in improving your landings.
If an instructor is not available when you are landing, then ask a friend to film it! Show the video to your instructor so that they can perform a post-landing evaluation. It is always advisable to have an experienced critic that can advise you on what to avoid during your next landing. As it is the most crucial and dangerous part of skydiving only continuous practice will allow you to perfect your landing pattern.
Speaking of videos, would you like to know of other reasons why you would want one for yourself? Read my article about the 5 reasons why skydiving videos are worth it where I talk about the surprising reasons why people don’t regret spending more to get a video of their skydive, especially their first one.
Enroll in a Skydiving Canopy Piloting Course
Getting a skydiving “B” license requires skydivers to complete all of the requirements listed on the USPA Canopy Piloting Proficiency Card. However, for beginner skydivers, you do not need to wait for the “B” license before enrolling in a canopy piloting course. No matter how many jumps you’ve made, you can already widen your knowledge and learn more skills!
A canopy piloting course, depending on the skydiving school, is either a single full day or multi-day course. The course includes ground training and debriefs as well as five hops and pops to gauge what you’ve learned and to check and monitor your progress.
On average, a standard canopy course costs around $250 with your own equipment, while the intermediate and advanced course will range between $350 and $450 with your own equipment. This excludes the lift fee for the five hops and pops requirement which is between $25-30 per jump.
In my opinion, canopy courses hold significant value, depending on your future jump plans. Given that skydiving has no age limit, you’re likely to continue for many years. If you are unsure about how long you can go skydiving, check out my article about whether there is an age limit in skydiving. It also includes the most incredible jumps at an advanced age.
What to Do in the Case of a Water Landing When Skydiving?
There are different ways to survive an intentional or unintentional water landing.
Try to land as if you are landing on the ground (slowly and smoothly) as close as possible to the shore. Before hitting the water remove your chest straps and loosen your leg harness (just make sure that you can still reach the toggles).
Once in the water, the buoyancy of your reserve will help keep you afloat – however, you will be in a dangerous face-down position – so you need to immediately release yourself from the harness, remove any entanglement, clear the canopy from your head and follow one of the seams to the edge.
Part of the requirements to get a “B” license requires enrollment in live training for a water landing. It will cost you around $50 for a one-day course that includes – theoretical training for a water landing (intentional or unintentional), how to avoid water landings, how to remove the harness and escape from entanglement while under the canopy, and lastly how to survive in the water.
In conclusion, no matter which type of landing you prefer or which tips or techniques you would prefer to use, remember – practice makes perfect. Do not hesitate to try different landing approaches that might be useful for you in the future. Also, please practice the Parachute Landing Fall (PFL) from time to time as you never know just when you might need it.
Enjoy your freefall!

